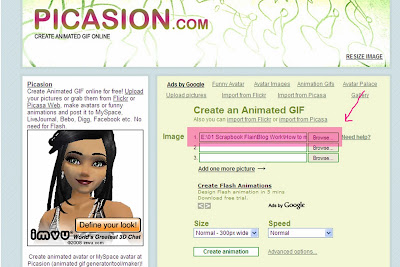
1. Create your slides (the images for each "blink" of the blinkie). For this example I made 6. The typical blinkie is 150 x 50 pxl. You should work in 1500 x 500, and when you are finished resize to the 150 x 50. Save each file separately.

2. Go to Picasion. For this lesson I chose Picasion, because it is SUPER EASY!
3. Upload your images in the order you want them in the slide show. You may add up to 10 images.
 4. After inserting all your images, click CREATE ANIMATION.
5. When your blinkie is finished, you can select a choice of Image URL or HTML Code to post on your blog. I prefer to select the Image URL code.
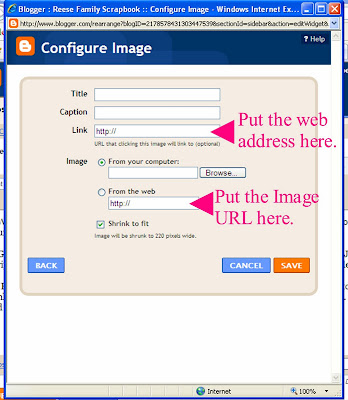
6. Go to CUSTOMIZE/LAYOUT/PAGE ELEMENTS/ADD A GADGET. Select HTML/Java Script. When the element pops up, just add or Image URL that you copied from the code.
7. IF YOU WANT TO ADD A URL (Uniform Resource Locator) like your blog address to the blinkie, then follow Step 6 and instead of choosing HTML/Java Script, select PICTURE. You can add your blinkie and the web address of your choice.

When you are finished, you have a BLINKIE!

Here's to more happy scrapping, and
Hugs from the heart,
Jeanette


This is a GREAT blog, certainly for a bit of dummy in this kind of stuff like me. LOL. I copied your blinkie and it will be on my blog. Keep up the good work. I LOVE it. Thanks for stopping by on my blog.
ReplyDeleteHave a great 2009!
I'm off to put your blinkie on my blog and then make my own. This was a clear, concise tutorial...well done!
ReplyDeleteYour blog is Awesome!! I'm putting you on my blog roll too.. Thanks so much for adding me to yours..
ReplyDeleteGreat tuts you have there and very helpful..Makes me want to make a blinkie..Very well done..
Have a blessed day.
Cat
Jeanette,
ReplyDeleteThank you for your comments on my blog. By the way, I love your blog. Great information and so cute. I do have a question for you: How do I post html code for people to easily grab my blinkie - as you have done? Each time that I've tried it will not appear as text. How did you do it?
Laurinda
http://laurindas.blogspot.com
Hi Passing by your blog after you commented on mine! Your blog is absolutely FANTASTIC!! I am going to grab your blinky and add to my blog! I am going to learn alot from you I am sure. If you didn't pass by I would have never found your blog! Thank you so much!! I am going to try your blinkie tut and see how it goes. Again..AWESOME BLOG!!!
ReplyDeleteVan
thetaste-of-ink.blogspot.com
thank you again for another awesome tut - I have made blinkies before but I didn't know about the site you pointed to - brilliant - so quick and easy!
ReplyDeleteYou are just so wonderful!!! Thank you for all your help because I have no ideal what I"m doing. And I did put your blinkie on my blog. Thanks again!!!
ReplyDeleteKathy
u blog is great
ReplyDeletei like it
and thanx 4 invitation
i.m put u link in my blog and i hope u link me
this my blog
http://noradigiart.blogspot.com/
Hello there... I'm back... I tried using the "Image URL" as you suggested and just paste it after opening the HTML/Java Script but it doesn't show up in my blog....instead it is the image url ....
ReplyDeleteI tried the 2nd option but an error message from blogger appears...
I hope you can enlighten me on this one... thanks as always...
Love Always,
My Simple Thoughts N Creations
As usual, thank for all your help.
ReplyDeleteJeanette my Darling, you are a star, thank you for my Blinkie you made me, I love it. lovies xxxxxx
ReplyDeleteI did it! I made a blinkie! Thanks so much for your help! I think it was blogger that was causing the problems before! My blinkie is on my blog http://evelyn186.blogspot.com Do come on over and have a look!!!
ReplyDeleteThanks a million for creating this website! I'm going to see what I can do next!
xxoo
Evee
thanks so much Jeanette for this tutorial...
ReplyDeleteLove and hugs
Lynneyboo
SBF
Jeanette thank you so much for this easy to follow tutorial! one question if I want others to grab my button don't I need a code? and if so how do I create a code? Thanks again your blog rocks!
ReplyDeletethanks a lot for the tutorial.I now have a blinkie for my blog...have also added yours too...
ReplyDeleteAlwaysCreationsTutToo
Thank you for this tutorial. It was very easy to make the blinkie, however I have a problem with the finish blinkie being very blury- not sure what I'm doing wrong.I have resized every thing to 600 pix. Please help!!!
ReplyDeleteThis comment has been removed by the author.
ReplyDeleteThis comment has been removed by the author.
ReplyDeleteJeanette, I figured out what I did wrong and my blinkie works just fine now. Thank you again!!! Your have a wonderful blog filled to the brim with helpful info. I'm sure I'll be a regular visitor.
ReplyDeleteWhat a cool jazzy site!!
ReplyDeleteThis is very useful for me, I think this article is very good, here are some credit keeper to guard the site, I hope to give more convenience, you can click to enter
ReplyDeletecredit keeper
Wow awesome. Thanks for the tutorial.
ReplyDeleteSudha
sudha-kalra.blogspot.com
I stayed on your blog 4ever because I love this song! Thanks for the info. ~Granny Enchanted
ReplyDeleteThanks much! For the tutuorial! Many Blessings!
ReplyDeleteI am sure that I can make the blinkie, but if I am sending it to someone how do I get it to link back to my blog?
ReplyDeleteToday I used this tutorial. Thank you! Thank you! I told everyone about this post so they can make their own blinkies too... And Cajun, to link mine I opened the image URL, right clicked to "copy image" and then pasted in blogger. From there I highlighted the image and linked it to my site. Then I copied the html. Voila. I figured out how to post the html for others to pick up the blinkie too. Links to instructions are at the bottom of my site: http://grannyenchanted.com/ Thanks Easy Custom Blogs!!
ReplyDeleteThanks for the great tutorial!
ReplyDeleteWhen I initially commented I clicked the "Notify me when new comments are added" checkbox and now each time a comment is added I get several emails with the same comment.
ReplyDeleteIs there any way you can remove people from that service?
Appreciate it!
http://projectwiki.herlig.net/index.php?title=Bruker:MikeMedra
Review my web site; Order Nuvocleanse; ,
I do not know which is your original message to delete it. Also, you should be able to unsubscribe every time you get an email. Please let me know if I can be of further assistance.
Delete